Pages

Tuesday, January 14, 2014

"Beauty"

"Beauty"
Tutorial
Ct tut for Scraps n Company
Tube by The Hunter-HERE
Kit by P.O. Concept-HERE
Alpha by Designz by Sue-HERE

This tutorial was written by me and any similarities to any other is just a
coincidence.
This tut assumes you have a moderate working knowledge of PSP
Filter used Unplugged Colors-Pastel
What you will need
 tube of choice
mask of choice
kit of choice
Alpha of choice

Always activate the top layer again after moving element
unless specifically stated.

Let’s get started.
Open an 800 x 800 blank canvas-Flood fill with white.
Copy and paste #50 –activate magic wand-click inside frame-expand by 19
New layer below frame layer-copy and paste pp19 .
Copy and paste tube-1/2 tube re-size 70 %-place below the frame layer,
erase what shows below the frame-Apply Unplugged Colors-Pastel-default settings.

Elements used –reduction %-placement
#67-100%-Top right corner of frame
#63-80%
Tube copy and paste full tube-re size 70 %-mirror-place on left
#25-50%
#26-50%
#53-50%
#75-100%-place above frame layer
#108-50%
#80-35%
#49-85%-Image rotate-free rotate –Right-90*-Sharpen
Close background-Merge Visible
Move the merged layer to middle of the canvas.
Copy and paste #23-behind the merged layer.
copy and paste PP19 as new layer-apply mask to this layer.
Add the alpha-with name of choice.
Add © and license info
As always would love to see your work and hope you enjoyed this !
Please send tags to laurag315@gmail.com
please put Laura in the subject line.

CT Tag "Amore Love Amour"

****CT FOR NINA´S GRAPHIX****
 CT Tag "Amore Love Amour"
by Nina´s Graphix-PTU kit


Monday, January 6, 2014

"Fairy Dreams" CT Tutorial-Forum tag

"Fairy Dreams"
animated tutorial


Ct tut for Scraps n Company
Tube by Pandora's creations -HERE
Kit by Bibi"s Collection-HERE


This tutorial was written by me and any similarities to any other is just a 
a coincidence.
This tut assumes you have a moderate working knowledge of PSP
and know how to use animation shop if animating
This tut was written in psp9
This tut has instructions for animated and non-animated tags
What you will need :
Tube of choice
kit of choice 
template by Spawns- HERE
Lets get started!
Open the template-Duplicate –close out original.
Delete Credits layer
Element 8
Element 41-64% Place behind foreground 1 layer
Go to foreground 2 layer-selections –selections all
copy and paste element 5 into selection.
Copy and paste tube as new layer-re-size 25%
Place to the right.

Go to foreground 1 layer-Selections-select all-
copy and paste element 3 into selection.
Element 114-resize 46%-duplicate then mirror
Place these two layers behind the tube layer.
Element 48-resize 45%
Element 3 –Place behind raster5 –blend mode –luminance-legacy
On Raster 5 use soften brush on edges


go to  layer above raster5 –copy and paste element 5 –blend mode –exclusion.
Add © and License info.
Now let’s add a frame new layer-rename frame
selections-selections all-copy element 2 and paste into selection
do not deselect –selections-modify-contract 5-delete-now deselect.
If animating stop here and see below
If not animating add drop shadow to frame
add name and save as Jpeg.

To animate duplicate the frames –rays and name layers two more times
for a total of 3 layers each
Apply noise settings-35-45-55%
Random and monochrome ticked-Take to animation shop.  

As always would love to see your results please mail to
laurag315@gmail.com
with Laura in the subject line
I may even post your results on my blog


Saturday, December 28, 2013

“Kiss me at Midnight”-Tutorial

“Kiss me at Midnight"

CT Tutorial for Scraps N Company
Tube ©Pandora Creations-HERE
Kit by Bibi's Collection-HERE

This tutorial was written by me any 
resemblance to any other is purely
coincidental.
This was written in psp9 but any version should work.
For the name i could not find a font i liked
so i pulled out my bamboo tablet and wrote it out!

Let"s get started


Open a 800 x 800 canvas
Flood fill with white.
Copy and paste Element 69-resize 65%
Rename layer –Frame
Copy and paste Paper2 behind frame
On frame layer use magic wand inside of frame-expand by 5
Go back to paper layer and hit delete.

Copy and paste tube –resize 44%-duplicate-place duplicate
behind the frame layer ,add dropshadow to top tube-erase
parts of the tube that hang over the frame on the bottom.
Copy and paste Full tube –resize 44%-duplicate and mirror
place on left and right side of frame ,add dropshadow.

Add these elements –Resize% included-see tag for placement.
64-30%-duplicate and mirror
57-55 %
53-45%
25-no resize-Image flip-place above frame layer
21-85%-Duplicate-place on both sides of tag.
24-35% Duplicate and mirror
Close off raster1-Merge Visible the rest.
resize 650 x 650-all layers
sharpen merged layer
image –canvas size 800 x x800
Move merged layer up a bit
Copy and paste Element 74-resize 48%.
add Element 76 -no resize 
Close off background -merge visible the rest
Add © and license info.
Add name 
Close background and save as png.
Hope you enjoyed this tutorial!
Would love to see what you come up with
please send tags to
in the subject line.

Friday, December 27, 2013

Cecile In Time -CT Tut

"Cecile In Time"

Ct tut for Scraps n Company
Tube by Di Halim-HERE
Kit byBibi"s Collection-HERE
 This tutorial was written by me and any similarities to any other is just a 
a coincidence.
This tut assumes you have a moderate working knowledge of PSP
This tut was written in psp9

Lets get started!


Open a 800 x 800 canvas
Selections>selections all>copy and paste paper3 into selection.
Copy and paste Element 32-Apply Mura Meister –copies

lower opacity to 68%
Element 16 –Opacity 66% move behind raster2.
Element 28-Element 66-see tag for placement.

Copy and paste tube –resize 55%-mirror
Element 17-Place above raster1-Erase what hangs over the clocks-Blend mode luminance
opacity 50%.
Merge visible-resize 650 x 650 –all layers.
Image-canvas size-800 x 800-Flood fill with white

go to merged layer -duplicate-resize 115%
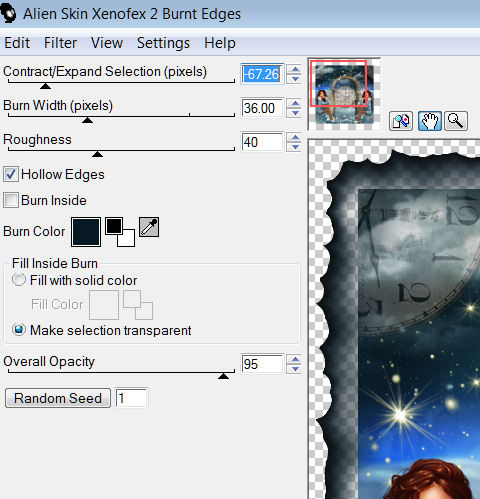
Apply xenofex2 –burnt edges

Go to Copy of merged –resize 95%
On this layer selections-selections all-modify-contract 5-Invert selection
apply Tramages –Pool shadow-default settings-apply again.
Delete raster1-Merge visible the rest.
Resize if you want and sharpen
Add © and license info

Would love to see what you do with this
Please email to laurag315@gmail.com
with Laura in the subject line-Thanks